How to convert images to WebP in WordPress, with real results
WordPress shows WebP images but does not turn your JPEG and PNG files into WebP. Here is how to do it for every image, keep the originals, and check that visitors get the WebP. Part of the WordPress image compression plugin.
By Sahadat Husain15 min readGuides

To convert images to WebP in WordPress, install a plugin that makes WebP copies and choose WebP in its settings. Then run its bulk tool on the images you already have. WordPress has accepted WebP uploads since version 5.8, but it never turns your existing JPEG and PNG files into WebP on its own. A plugin does three jobs WordPress skips: it converts old images, it keeps the originals, and it gives older browsers the JPEG. We did this with our own plugin, Blinkimg on WordPress.org, and measured every file.
Does WordPress convert images to WebP by itself?
No. WordPress displays WebP and AVIF, but it keeps every upload in the format you gave it. WordPress’s announcement, WordPress 5.8 adds WebP support, covers uploading and using WebP files. A plan to save new uploads as WebP by default was dropped before WordPress 6.1 shipped. AVIF support arrived in WordPress 6.5.
Both formats depend on your server’s image library, GD or Imagick. To see what yours can make, open Tools, Site Health, Info, then Media Handling. If the library cannot write WebP, no plugin that converts on your server can either.
Which way should you convert your images?
Pick by two questions: do you need the images you already have converted, and do you want the original kept? Each route gives something and costs something:
| Route | New uploads | Images you already have | Original kept | Older browsers |
|---|---|---|---|---|
| Convert before you upload | Yes, by hand | Re-upload each one | On your computer | Get the WebP or nothing |
| A code filter in WordPress | Yes | No | The upload stays a JPEG | Get the WebP or nothing |
| Modern Image Formats (WordPress’s team) | Yes | No | Yes | Optional picture tag |
| A converter plugin such as Blinkimg | Yes | Yes, in bulk | Yes, in a private backup | Get the JPEG |
The WordPress Performance Team’s own plugin, Modern Image Formats, works on new uploads only. Its page says it makes AVIF by default when the server supports it. If your library is new, that may be all you need. If you have years of JPEGs, you need a plugin with a bulk tool.
How to convert images to WebP in WordPress with a plugin
These steps use Blinkimg 0.1.1 on WordPress 7.1.4. The screens come from our own test sites, with our own photos.
Install the plugin
In your admin, open Plugins, Add Plugin, search for Blinkimg, then click Install Now and Activate.
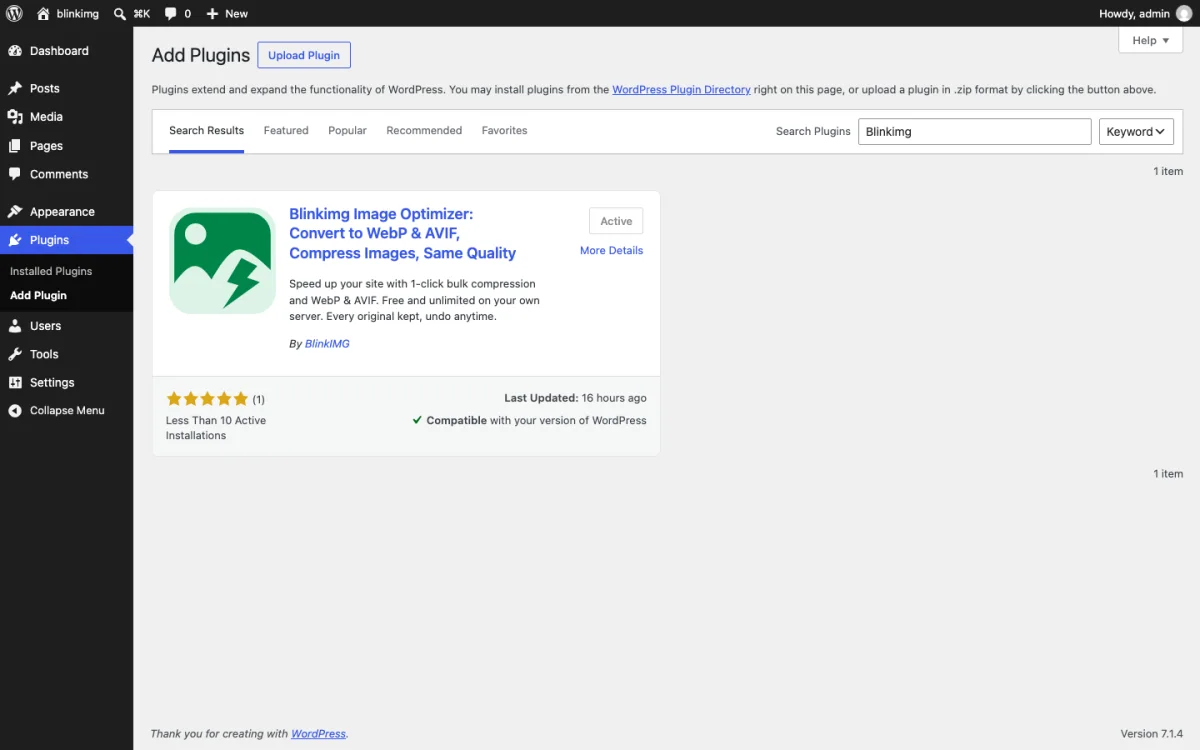
Our own site, where the plugin is already active. On yours, the button says Install Now Connect an account, or convert on your own server
Open Media, Blinkimg. Paste an API key and press Connect, or choose Use local conversion without an account.
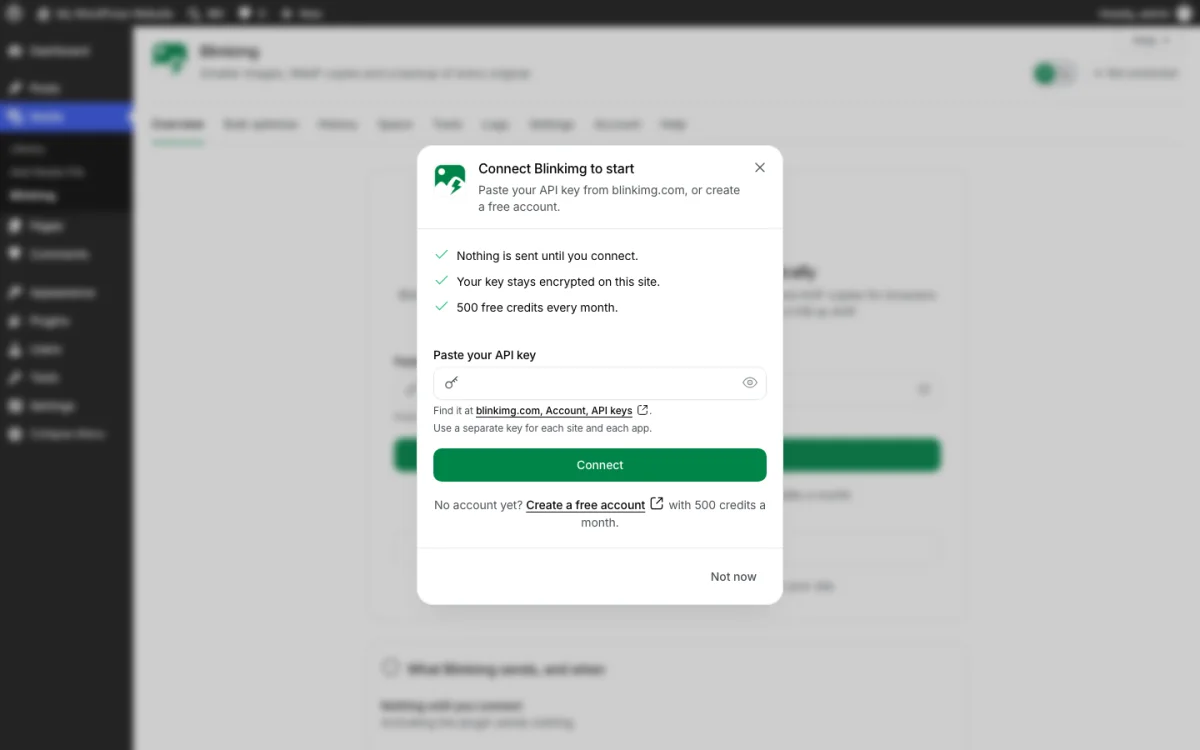
Connect an account for the cloud engine, or close the dialog and pick local conversion Check the engine and the quality
Open Settings, Compression and check the Engine and the Quality. Auto is the default quality.
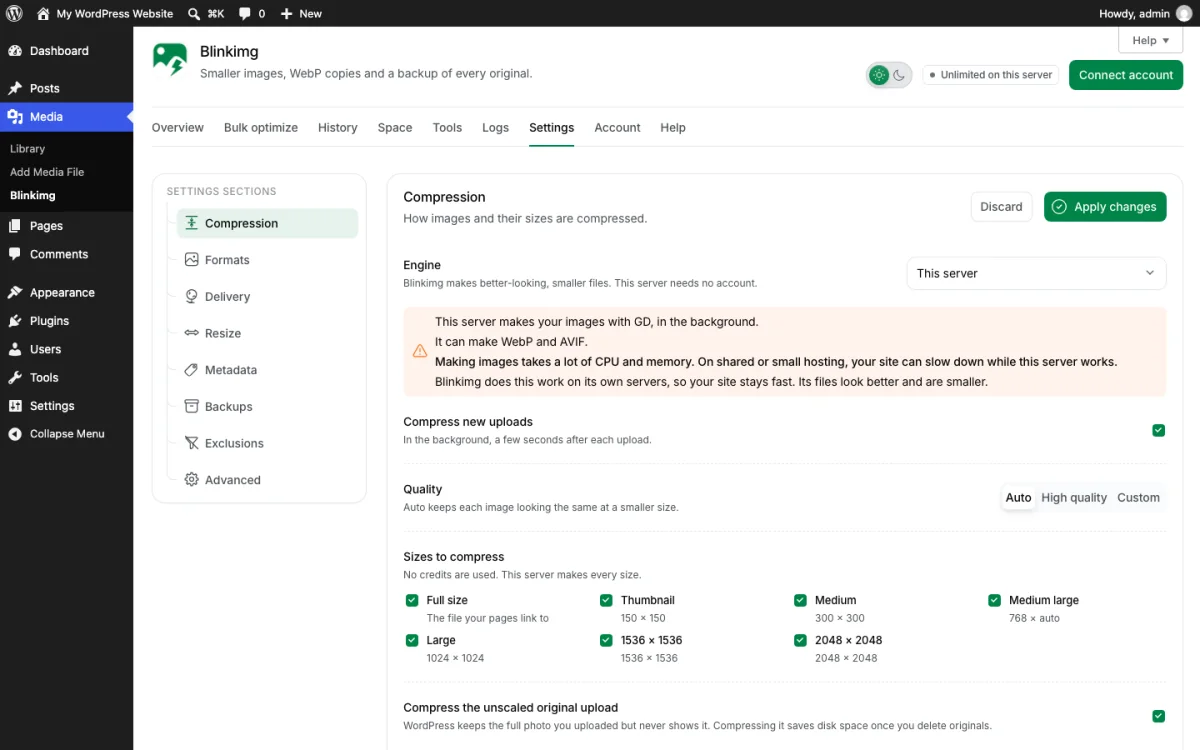
This server uses GD here, and warns that it uses your CPU and memory Choose WebP under Formats
Open Settings, Formats. Choose WebP, or WebP and AVIF, under Copies to create, then click Apply changes.
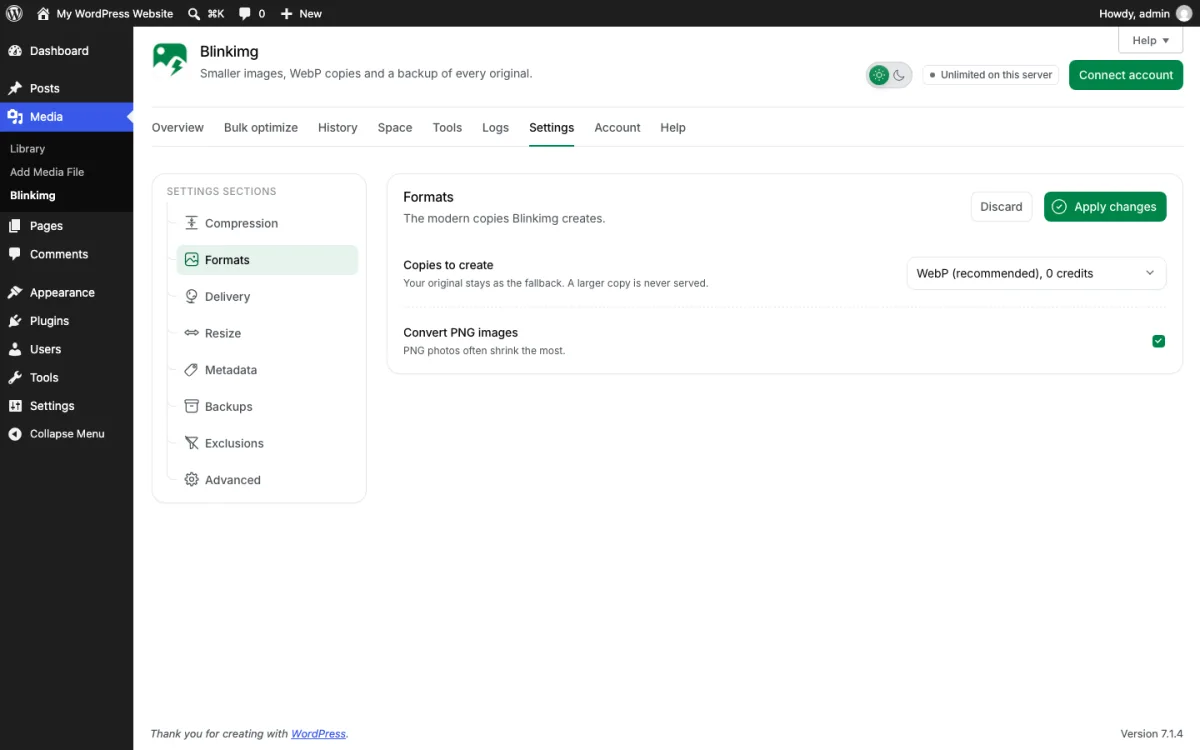
Your original stays as the fallback, and a larger copy is never served Keep Picture tags for delivery
Open Settings, Delivery and keep Picture tags. Click Test my server if you want to see the copies served.
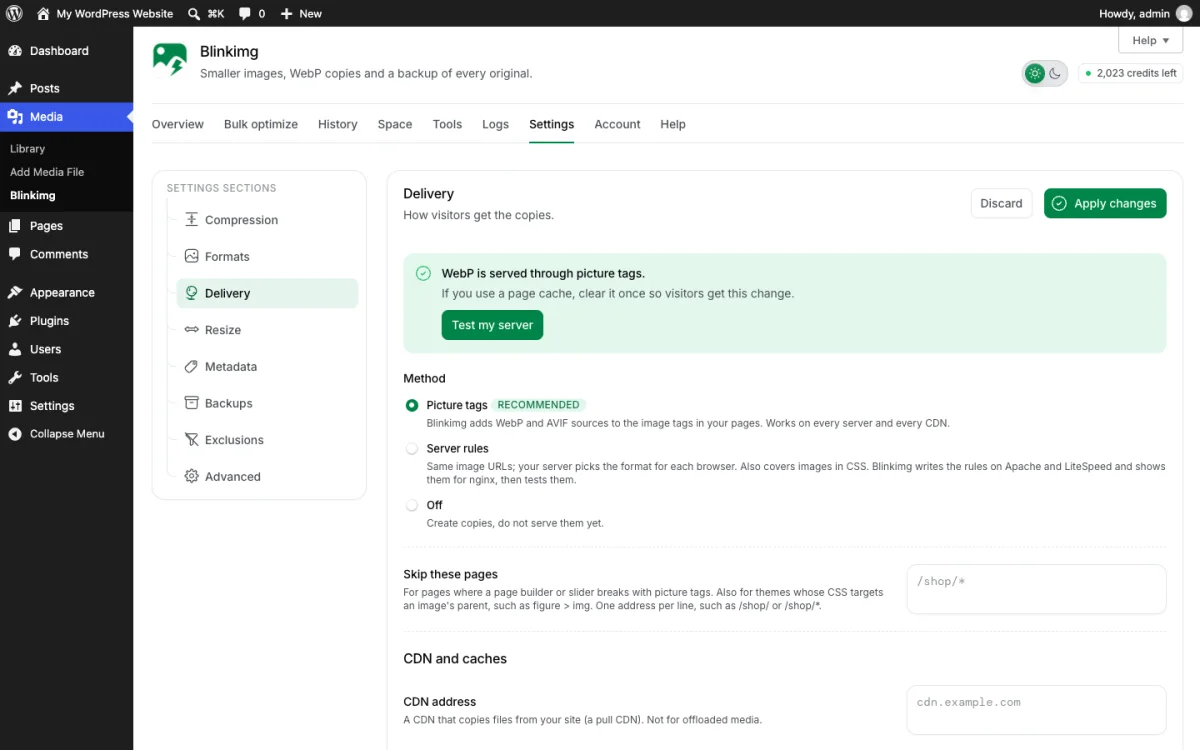
Picture tags work on every server and every CDN Run Bulk optimize
Open Bulk optimize and click Start optimizing. You can close the page while it runs.
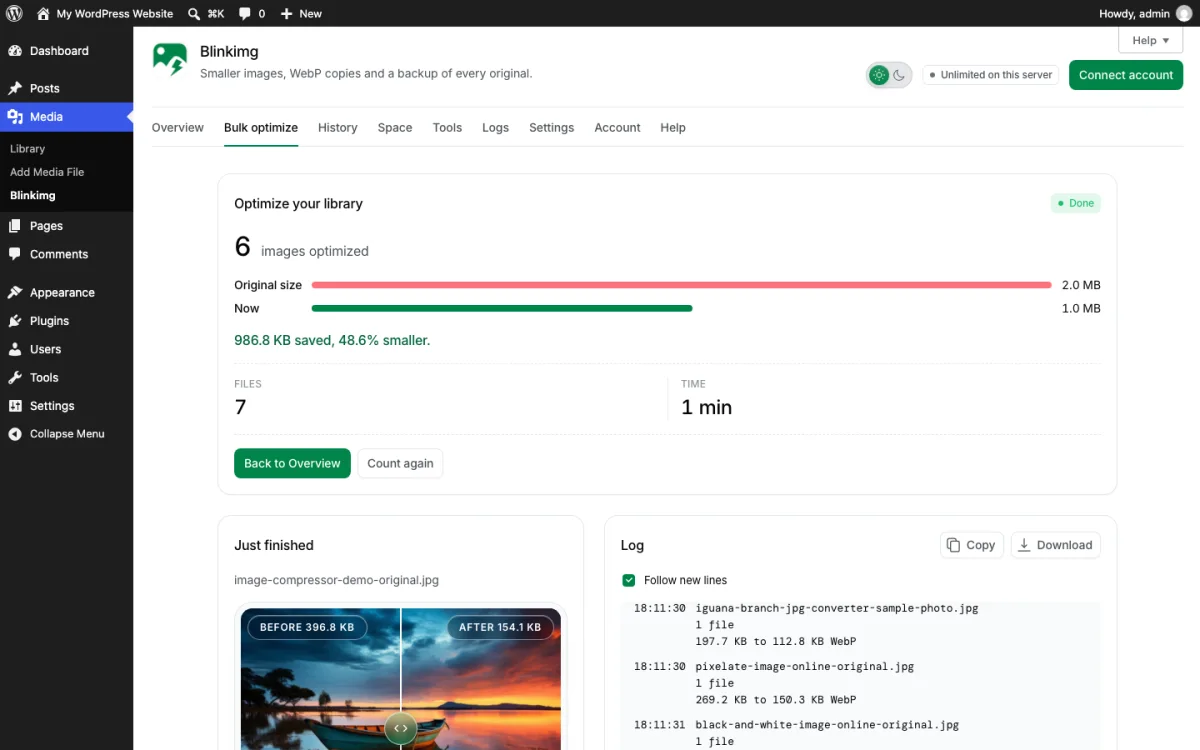
Our 6 test photos on the free engine: 986.8 KB saved in about a minute Compare the result
Open Media, Library in the list view and click Compare on any image. Drag the slider to see the original beside the WebP.
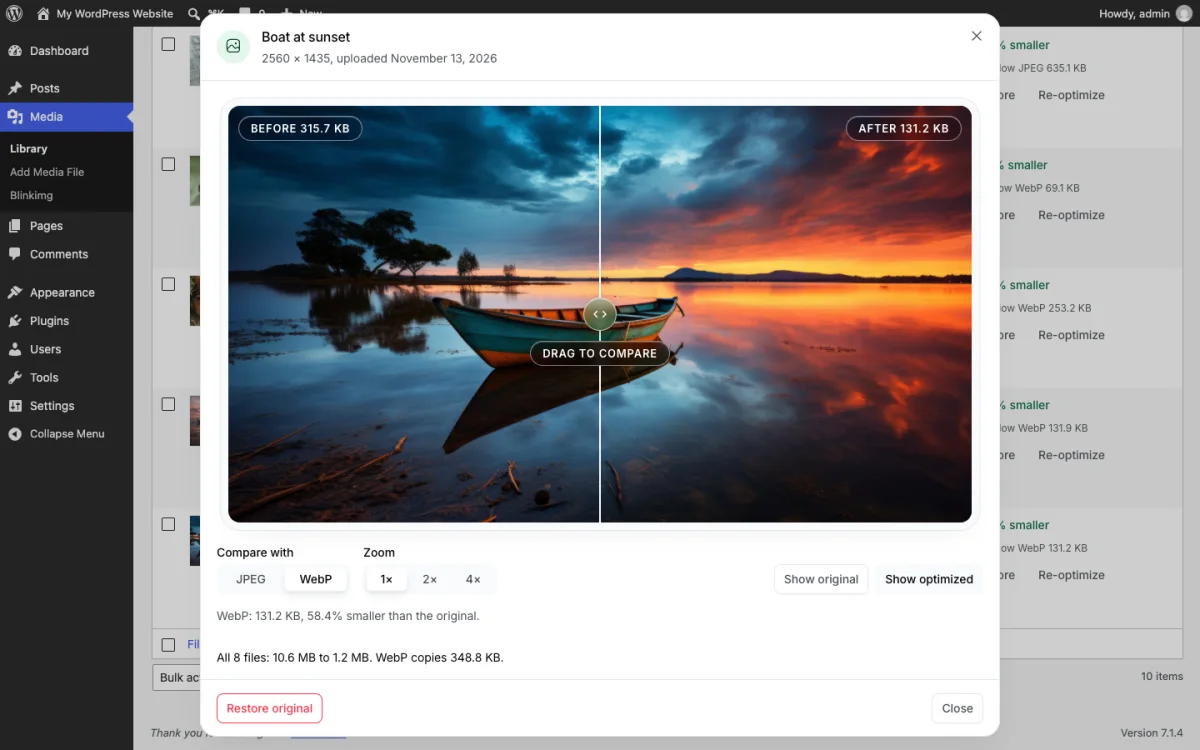
Restore original brings the old file back at no cost
What happens after the bulk run?
New uploads get their WebP copy in the background, about 15 to 30 seconds after the upload finishes. Bulk optimize starts with the images your published posts and pages use, so visitors see the gain first.
Want to leave some images alone, such as a logo? Add a folder, a file name or a size in KB under Settings, Exclusions. Prefer the command line? wp blinkimg bulk start runs the same bulk job from WP-CLI.
What did converting to WebP save?
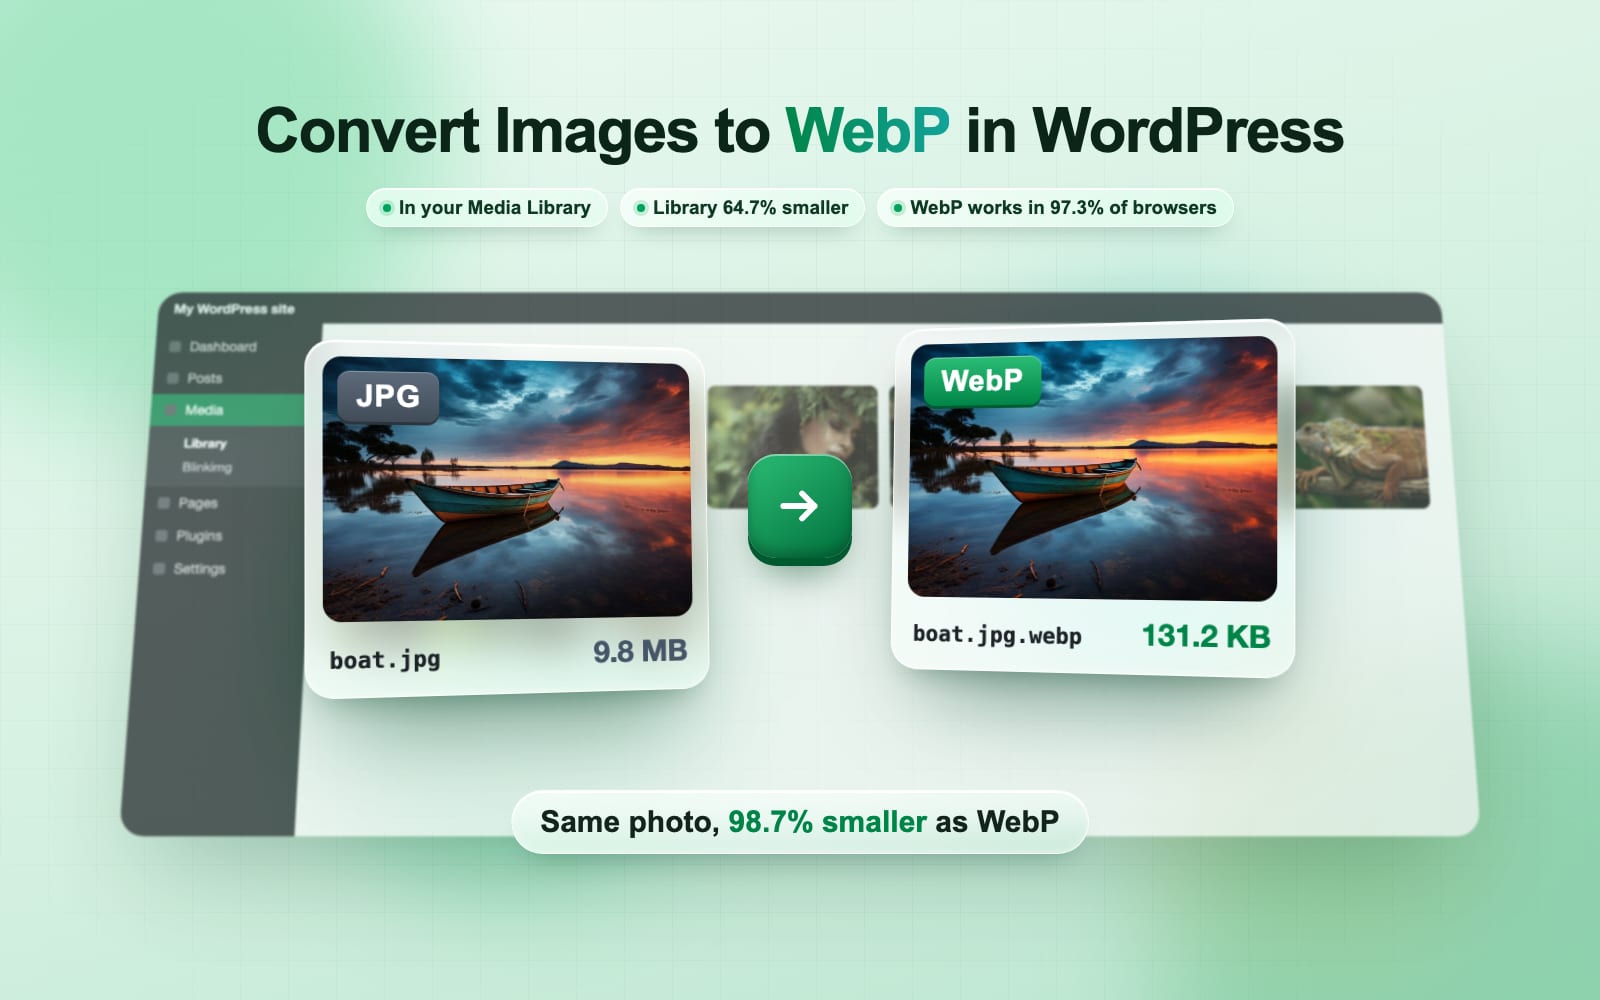
On large camera files, the WebP came out at a few percent of the upload. On images already sized for the web, it roughly halved them. Here are both tests.
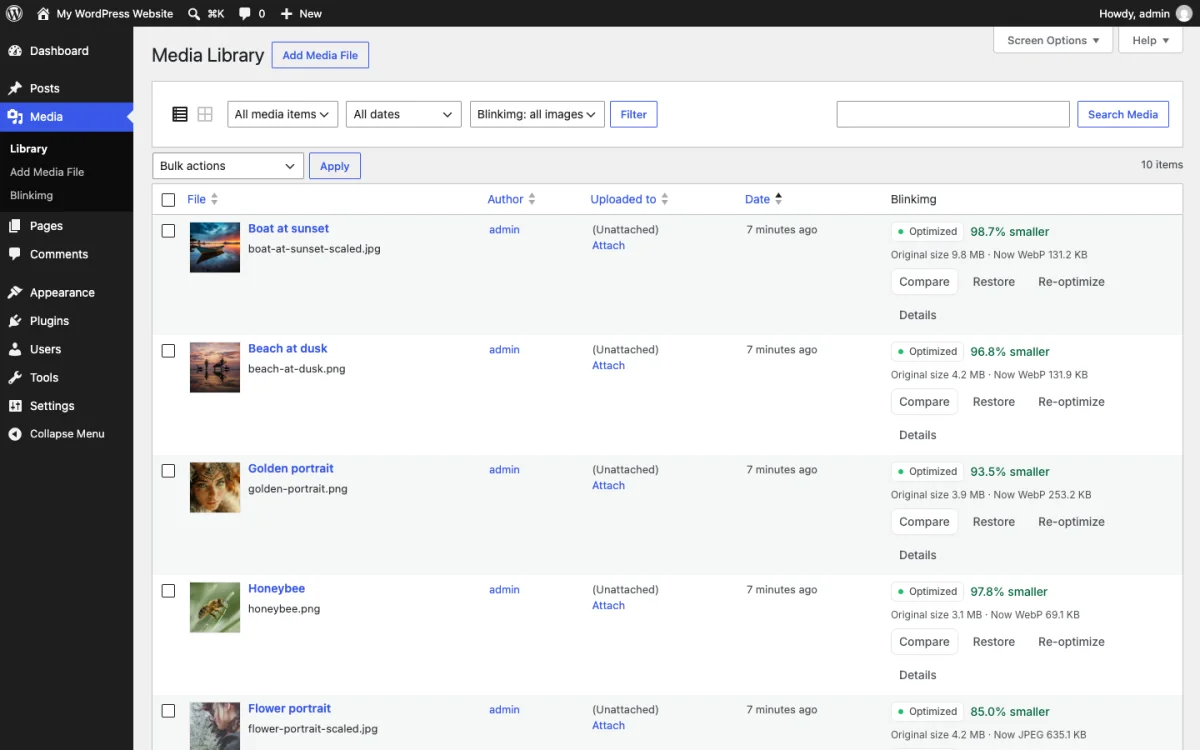
Boat at sunset, uploaded as JPEG
- Upload9.8 MB
- WebP131.2 KB
Honeybee, uploaded as PNG
- Upload3.1 MB
- WebP69.1 KB
Beach at dusk, uploaded as PNG
- Upload4.2 MB
- WebP131.9 KB
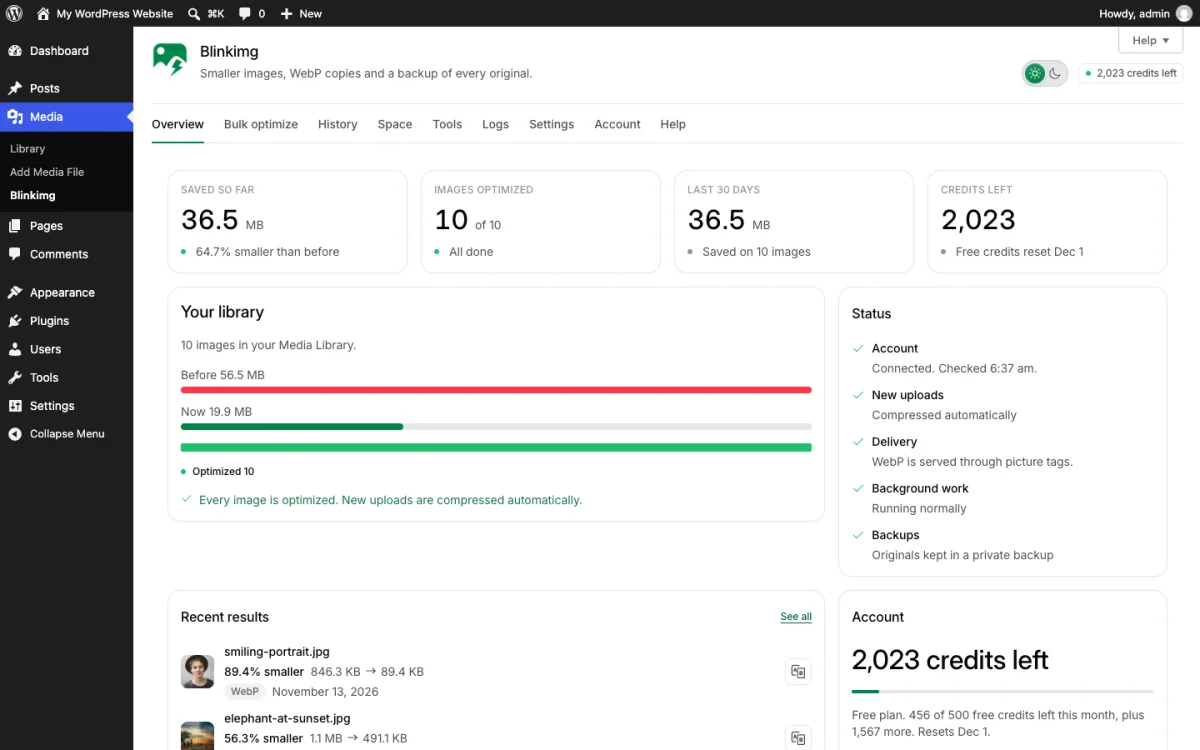
Whole library, 10 images
- Before56.5 MB
- After19.9 MB
| File | Uploaded as | Upload | WebP visitors get | Smaller |
|---|---|---|---|---|
| Boat at sunset | JPEG | 9.8 MB | 131.2 KB | 98.7% |
| Honeybee | PNG | 3.1 MB | 69.1 KB | 97.8% |
| Beach at dusk | PNG | 4.2 MB | 131.9 KB | 96.8% |
| Whole library, 10 images | Mixed | 56.5 MB | 19.9 MB | 64.7% |
The boat’s 98.7% is not all WebP, and the gap is worth knowing. WordPress scales any upload larger than 2560 pixels, so the page serves a 2560 × 1435 copy. WordPress’s own scaled file was 315.7 KB before Blinkimg ran. Blinkimg’s WebP of it is 131.2 KB, 58.4% smaller. So WordPress’s scaling did most of the work on that photo, and WebP took off more than half of what was left. The two PNGs show the biggest WebP gain, because PNG stores a photo without loss.
The free engine on your own server makes larger files than the cloud engine. We ran it on 6 JPEG files from our own site, each already sized for the web. They hold 4 photos: the iguana appears at three sizes.
| File | JPEG | WebP, This server (GD) | Smaller |
|---|---|---|---|
| Sunset with a boat, 2400 px | 396.8 KB | 154.1 KB | 61.2% |
| Iguana, 1920 px | 576.8 KB | 262.3 KB | 54.5% |
| Woman among leaves, 1024 px | 217.2 KB | 112.9 KB | 48.0% |
| Couple in the grass, 1024 px | 269.2 KB | 150.3 KB | 44.2% |
| Iguana, 1024 px | 197.7 KB | 112.8 KB | 42.9% |
| Iguana, 1024 px, a heavier JPEG | 374.0 KB | 252.5 KB | 32.5% |
| All 6 | 2.0 MB | 1.0 MB | 48.6% |
These are not the same files as the first table, so the two engines cannot be ranked from them. They show the range: a big original shrinks most, and a file someone already compressed shrinks less. Our post on AVIF vs WebP vs JPEG compares the formats on identical pixels.
How does WordPress serve the WebP to visitors?
WordPress keeps linking to your JPEG, so a plugin has to point browsers at the WebP. The copies sit beside each file, as photo.jpg.webp and photo.jpg.avif, and the original stays in place.
You upload
WordPress saves photo.jpg and its sizes
Copies are made
photo.jpg.webp beside each size
photo.jpg.avif if you ask
The page lists all three
A picture tag: AVIF, WebP, JPEG
The browser picks
The first one it can show
Picture tags or server rules?
There are two ways to point the browser at the copy, and each has a catch:
- Picture tags. The plugin wraps each image in a
<picture>tag that lists AVIF, then WebP, then the JPEG. Each browser takes the first one it can show. Picture tags work on every server and every CDN. They miss images set as CSS backgrounds and images a theme prints by hand. - Server rules. The web server answers a request for photo.jpg with the WebP when the browser accepts it. The address stays .jpg, and CSS backgrounds are covered too. Blinkimg writes these rules on Apache and LiteSpeed, tests them with two tiny images, and removes them if the test fails. On nginx, you add the lines it shows. Server rules do not work with a CDN in Blinkimg yet.
A picture tag can break a theme that styles an image through its parent, such as figure > img. Add that page to Skip these pages in Settings, Delivery. To see any page without the copies, add ?blinkimg=original to its address.
How do you convert images to WebP in WordPress without a plugin?
You can tell WordPress to save the sizes it makes as WebP with the image_editor_output_format filter. Add this to a small custom plugin or your child theme’s functions.php:
add_filter( 'image_editor_output_format', function ( $formats ) {
	$formats['image/jpeg'] = 'image/webp';
	$formats['image/png']  = 'image/webp';
	return $formats;
} );Know what it does not do before you rely on it:
- Only new uploads. The images already in your library keep their JPEG sizes.
- No fallback. Every browser and every app gets the WebP.
- No undo. The JPEG sizes are never made, so turning the filter off later leaves those uploads as WebP.
- Your server does the work. GD or Imagick must write WebP, and each upload takes CPU and memory.
The other no-plugin route is to convert files on your computer, then upload the WebP. Our WebP converter converts a batch at once, with nothing to install. It suits a new site. For a site with an existing library, re-uploading means re-inserting every image into every post.
Should you choose WebP or AVIF?
Choose WebP for the widest reach, and add AVIF if you want the smallest files. With picture tags, you can serve both: a browser takes AVIF when it can, then WebP, then the JPEG. Our measured comparison of AVIF vs WebP vs JPEG shows where each one wins.
AVIF has two costs. On Blinkimg’s engine, an image with WebP and AVIF costs 4 credits instead of 2. On your own server, AVIF needs a GD or Imagick that can write it. The Logs tab’s System card names your image editor and what it reads.
How do you check that WordPress serves WebP?
Open a page in Chrome, press F12, open the Network tab, filter by Img and reload. The Type column should say webp or avif for your photos. This test works for picture tags and server rules alike.
The common right-click test, Open image in new tab, can mislead you. With server rules, the address still ends in .jpg while the bytes are WebP. With picture tags, the new tab shows the WebP address.
In PageSpeed Insights, the format and file-weight warnings now sit under Improve image delivery. Older reports and many guides still call them Serve images in next-gen formats. Run a page before and after: your score depends on more than images.
Why is WordPress still showing JPEG instead of WebP?
Most cases come from a cache or an image the plugin cannot reach. Match the symptom to the fix:
- Nothing changed after the run. Your page cache still holds the old HTML. Blinkimg clears 11 cache plugins and, with a token, Cloudflare. Clear any other cache by hand.
- A hero or slider image stays JPEG. The theme sets it as a CSS background. Switch Delivery to Server rules on Apache or LiteSpeed.
- No WebP files appear on your own server. GD or Imagick cannot write WebP. Check Tools, Site Health, Info, Media Handling.
- The WebP is missing for one image. The copy came out larger than the original, so it is never served.
- Images look worse or savings are tiny. Two plugins compress the same uploads. Let only one compress new uploads.
- Images live in a cloud bucket. Offloaded media is outside the uploads folder and is not covered.
Is converting to WebP in WordPress free?
Yes, on your own server. Choose This server and GD or Imagick makes every file, with no account and no limit. The cost is your server’s CPU and memory, which can slow a site on shared hosting.
Blinkimg’s engine does the work on its servers and made smaller files in our tests. A free account gets 500 credits a month. An image and all the sizes WordPress makes of it cost 1 credit to compress, 2 with WebP and 4 with WebP and AVIF. So 500 credits cover 250 images a month with WebP. The sizes are free, and Restore costs nothing.
How we tested
- The files. Test 1: 10 photos from blinkimg.com’s own image folders, including the boat (JPEG, 9.8 MB), the honeybee (PNG, 3.1 MB) and the beach (PNG, 4.2 MB). Test 2: 6 JPEG files from blinkimg.com’s own pages, 197.7 KB to 576.8 KB, 1024 to 2400 pixels wide. They hold 4 photos; one iguana photo appears three times, at two sizes and two JPEG weights.
- The tools. Blinkimg 0.1.1. Test 1 on WordPress Playground with Blinkimg’s engine. Test 2 on WordPress Playground 7.1.4 with PHP 8.3.36 and GD, engine This server. Auto quality and WebP copies in both.
- The dates. Test 1 on 13 November 2026, test 2 on 14 November 2026.
- The sizes. KB and MB in 1,000-byte units. Test 2 read from the file system: each upload against its .jpg.webp copy. Test 1 as Blinkimg’s Media Library and Overview report them.
- The sources. WordPress’s core notes and developer reference, the Modern Image Formats page, Can I use and Chrome’s PageSpeed docs, each read on 14 November 2026. How we measure covers the rest.
Your next step
Install Blinkimg from WordPress.org, choose WebP under Settings, Formats, and run Bulk optimize. To make the files smaller before they reach WordPress, read how to reduce image file size.
Read the full guide: How to reduce image file size on any device.
Questions
- Does WordPress support WebP images?
- Yes. WordPress has accepted WebP uploads since version 5.8 and AVIF since 6.5, as long as the server’s GD or Imagick can read them. WordPress does not convert JPEG or PNG files to WebP by itself. For that, you need a plugin or the image_editor_output_format filter, which only affects new uploads.
- How do I convert existing images to WebP in WordPress?
- Use a plugin with a bulk tool. In Blinkimg, choose WebP under Settings, Formats, then open Bulk optimize and click Start optimizing. It works through the library in the background, starting with images your published pages use. The code filter and Modern Image Formats only convert images you upload after turning them on.
- Will converting to WebP reduce image quality?
- At Auto quality, the WebP is made to look the same as the original at a smaller size. WebP is a lossy format, so it is not bit-for-bit identical. Use Compare in the Media Library to drag between the two, and Restore original if you prefer the old file. High quality uses quality 90 instead.
- Does converting to WebP delete my original images?
- Not with Blinkimg. Before any file changes, it copies the original into a private backup folder, and Restore brings it back at no cost. The JPEG also stays in place as the fallback. Only the optional WebP only setting replaces the JPEG, and it moves the old files to a bin first.
- Can I convert images to WebP in WordPress without a plugin?
- Yes, for new uploads. Add the image_editor_output_format filter to map image/jpeg and image/png to image/webp. WordPress then saves the sizes it makes as WebP. It leaves existing images alone, gives no fallback for apps that cannot show WebP, and needs a GD or Imagick that can write WebP.
- How do I know if my WordPress site is serving WebP?
- Open the page in Chrome, press F12, choose the Network tab, filter by Img and reload. The Type column shows webp or avif for each converted image. Do not trust the image address alone: with server rules, a WebP can arrive from an address that still ends in .jpg.
- Does converting images to WebP help SEO?
- It helps through speed, not the format itself. Smaller images make a page load faster, and PageSpeed Insights lists heavy images under Improve image delivery. In our test, one WordPress library dropped from 56.5 MB to 19.9 MB. Keep alt text on every image too: Blinkimg fills missing alt text from clean image titles.
- Should I use WebP or AVIF on WordPress?
- Use WebP if you want one format that nearly every browser shows. Add AVIF if you want the smallest files and your plugin can serve both with a fallback. Can I use lists WebP at 97.32% of browsers and AVIF at 96.71%. On Blinkimg’s engine, AVIF doubles the credits per image.
- Why are my images not showing as WebP after converting?
- A page cache is the most common cause: the old HTML still links to the JPEG. Clear every cache, including your CDN. Images set as CSS backgrounds also stay JPEG under picture tags. On your own server, check that GD or Imagick can write WebP under Tools, Site Health, Info.
- Is a WebP plugin bad for shared hosting?
- It depends on where the converting happens. On your own server, GD or Imagick uses CPU and memory for every image, which can slow a busy shared site during a bulk run. A cloud engine moves that work off your server. Blinkimg’s engine sends at most 100 requests a minute, about 50 images.