Drop a photo and the editor opens on Regions with a white border already drawn at 2% of the short side. Set the width and the colour, round the corners if you like, and save: same pixels, optimised file. One of the image tools.
Output format
– / –
Drop images or browse
JPEG · PNG · WEBP · AVIF · HEIC · up to 50 at once · max 30 MB each
HEIC
PNG
JPEG
AVIF
WEBP
Advanced settings1 on
SmallerAutoBetter
Auto tunes each image.
A hard cap for the number your form demands.
KB
A floor for forms that refuse small files.
Max resolution
×
Empty side keeps the ratio. Never enlarges.
A real border, before and after
Original · 177.2 KB
White border 14px · 85.1 KB
−52%
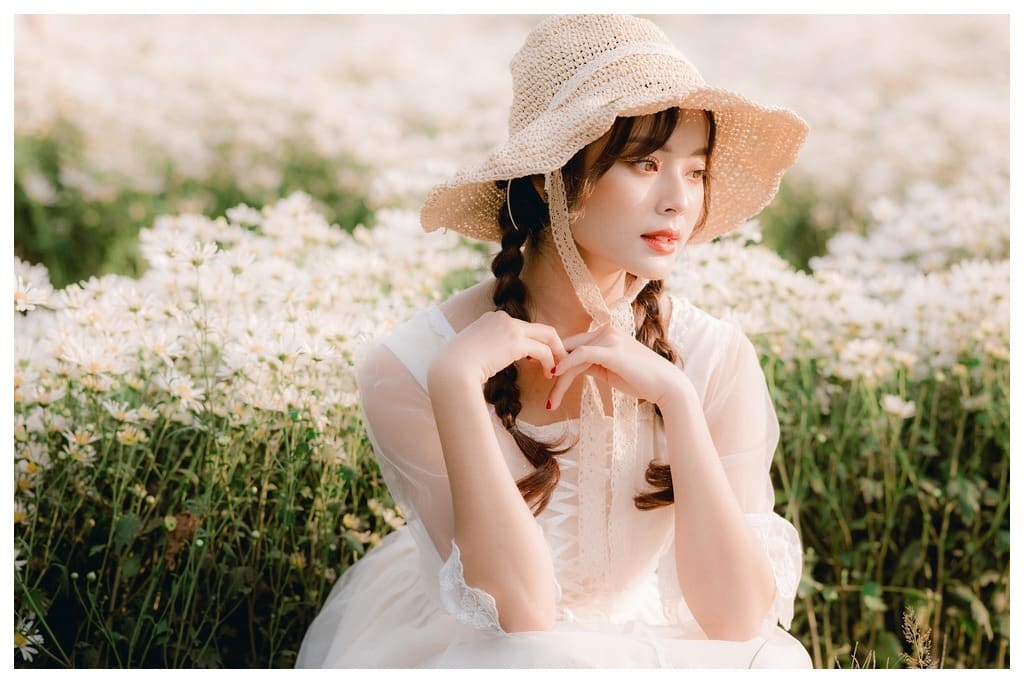
One of our photographs, actually given a white border in the editor and saved by our engine; the sizes are the real files'. Drop your own image and do the same.
How it works
Drop, border, save
Three steps, no account. The file leaves smaller than it arrived.
01
Drop
Drop a photo and the editor opens on Regions with a white border drawn.
02
Border
Set the width on the dial, pick a colour, round the corners if you like.
03
Save
The bordered file comes out optimised, at the same pixel size.
How do I add a border to an image?
Drop the photo and the editor opens on the Regions tab with a white border already drawn at 2% of the short side. The Border dial sets the width from 0 to 100, which runs from nothing to 5% of the short side. The swatches beside it switch to black or green, and the colour well opens your system picker for any hex value. Tap Save and the bordered file comes back optimised. Every other tab still works in the same session: crop to a ratio first, and the border follows the new frame.
Does the border change my image size?
No. The border is drawn inside the frame, so the pixel size and the ratio you chose stay exactly as chosen. A 1080 × 1080 post stays 1080 × 1080, and a 1200 × 630 preview stays 1200 × 630. The line covers the outermost pixels. At 2% of the short side on our 1024 × 683 photograph, that is a 14-pixel band. A tool that grows the canvas instead adds twice the border width to each dimension. A 1080 square leaves it larger than the preset asked for, and Instagram’s help page says a wider photo is sized down to 1080 again.
White border for Instagram: border or padding?
An inset white border on a 1:1 or 4:5 post is what this page does. A white frame that fits a tall photo into Instagram without cropping is padding, and that is a different job. Instagram’s help page accepts feed images between 3:4 and 1.91:1 and crops anything outside that range. A 2:3 portrait therefore needs white bars added above and below, not a line drawn inside it. That is the Fit switch on the Instagram size page: the whole photo inside 1080 by 1350 on a fill you pick. The editor’s Frame tab (Beautify) pads every side evenly instead, without squaring the photo, and a plain resize the image keeps every pixel without a border at all.
Can I round the corners too?
Yes. The Corners dial on the same tab rounds the frame, and the border follows the curve. Rounded corners with nothing behind them leave real transparency, so the save switches to PNG. Pick a Background fill and the corners fill with that colour, and the file can stay a JPEG. One place not to use it: app icons, which Apple and Google Play mask themselves. The square crop page carries both stores’ rules.
Which border width looks right?
The page opens at 2% of the short side, and that is a keyline: visible at thumbnail size, invisible as a design choice. The dial tops out at 5% of the short side, which reads as a mat. Because the width is a share of the short side, the same dial position gives the same look at every export size. A 1080 post and an A4 print at 2480 × 3508 get a line in the same proportion. Check the preview at the size the photo will be seen, not zoomed in; a line that looks thin on a monitor is what a feed shows.
Black, white or a brand colour?
Pick the colour for the page the photo will sit on, not for the photo. White separates a photo from a dark feed and disappears on a white one; there, black or a light grey from the colour well does the separating. A brand colour drawn from the well comes out identical on every photo in a set, because the same hex value is drawn each time. For a product shot on a white background, a hairline in a light grey marks where the photo ends without shouting. The colour is exported content, so it never follows a viewer’s light or dark mode.
Does a border hurt quality or grow the file?
Our photograph is 1024 × 683. It shows a woman in a straw hat resting her chin on her hands among white flowers. It exported at 177.2 KB plain and 173.8 KB with a 14-pixel white border, both JPEGs at 92. Quality 92 was the editor’s JPEG step before 5 October 2026. A flat border compresses to almost nothing, so the two exports differ by 2%. Our engine then saved the bordered photo at 85.1 KB, the file in the figure at the top of the page.
File
Pixels
Size
Our photograph, exported
1024 × 683
177.2 KB
White border, 14 px, exported
1024 × 683
173.8 KB
White border, saved by our engine
1024 × 683
85.1 KB
Source: one of our photographs, a woman in a straw hat resting her chin on her hands among white flowers, at 1024 × 683. The border is 2% of the short side, drawn inside the frame, so every file is 1024 × 683. The exports are JPEGs at 92, as the editor saved them before 5 October 2026. The last row is the file our engine made.
Every byte count is the size of an actual file, not an estimate. A row marked exported is the picture as a JPEG at 92, the editor’s save before 5 October 2026. The engine’s row is the file the engine produced from that JPEG. The photograph is one of our own. Drop your own file into the tool above to rerun any of them. How we measure names the sources and the settings.
Can I border many photos the same way?
One at a time in the editor. But every photo dropped on this page opens with the same white border at 2%, so a set of product shots gets an identical keyline: drop, Save, next. A custom width or colour is set per photo. Every save lands in the same download list. The compressor beside the editor then takes up to 50 files in one run, with a Max file size for a shop that caps uploads.
When a border is the wrong tool
A white frame that fits a tall photo into a square?
That is padding. It adds canvas; the border here never does.
A store icon?
Deliver a full square. Apple and Google Play mask the corners themselves.
A polaroid edge or a picture-frame texture?
A decorative template is a design tool's job, not a border dial.
Short answers specific to this tool. Try it above and the editor settles the rest.
Q:How do I add a border to a picture?
Drop the picture into the border tool. The editor opens on the Regions tab with a white border already drawn at 2% of the short side. Drag the Border dial for a thinner or thicker line, tap a swatch or the colour well for another colour, and tap Save. The bordered file comes back optimised, at the same pixel size it went in.
Q:How do I outline an image with a stroke?
Add a border: it is a stroke drawn along the edge of the image, inside the frame, so the pixel size stays. The editor opens with a white one at 2% of the short side. Drag the Border dial up to 5%, tap black, white or green or pick any hex, and round the corners if you like.
Q:How do I add a white border to a photo for Instagram?
For a keyline inside a post: crop to 1:1 or 4:5 on the Crop tab, keep the white border on the Regions tab, and save. For a white frame that fits a tall photo into the feed without cropping, you need padding, not a border. Instagram's help page accepts feed images between 3:4 and 1.91:1 and crops anything taller. The Instagram page's Fit switch does that padding: the whole photo inside 1080 by 1350 on a white fill.
Q:Does adding a border change the image size?
No. The border is drawn inside the frame, so the width, the height and the ratio stay exactly what you chose. A 1080 × 1080 post is still 1080 × 1080 with the border on. The line covers the outermost pixels: on our 1024 × 683 photograph the 2% border is a 14-pixel band. A tool that grows the canvas adds twice the border width to each side instead.
Q:Can I add a black border to an image?
Yes. Once a border exists, three swatches sit beside the Border dial: white, black and green. Tap black and the line switches at once, at whatever width the dial holds. Black reads well around a light photo on a light page, where a white border would vanish. The colour well next to the swatches takes any other hex value.
Q:Can I choose a custom colour for the border?
Yes. The colour well beside the swatches opens your system's colour picker, so you can type a hex code or pick from the wheel. A brand colour applied to a set of product shots comes out identical on every one, because the same value is drawn each time. The border colour is exported content, so it stays the same in light and dark mode.
Q:Can I round the corners of the border?
Yes. The Corners dial on the same Regions tab rounds the frame from 0 to 100, and the border follows the curve. Rounded corners with nothing behind them leave real transparency, so the save switches to PNG to keep it. Pick a Background fill and the corners fill with that colour instead, which lets the file stay a JPEG.
Q:Will the border affect image quality?
The border itself covers a band of edge pixels and touches nothing else. Saving encodes the file once. Before 5 October 2026, our photograph weighed 177.2 KB plain as the editor's JPEG at 92. With a 14-pixel white border it weighed 173.8 KB: a flat band costs almost nothing to encode. Our engine saved the bordered photo at 85.1 KB.
Q:Can I add a border to multiple images at once?
One at a time in the editor. But every photo dropped on the border tool opens with the same white border at 2%, so a set of product shots gets an identical keyline: drop, Save, next. A custom width or colour is set per photo. Every save lands in the same download list, and the compressor takes up to 50 files in one run afterwards.
Q:Can I add different borders to each side?
No. The Border dial draws one width on all four sides, in one colour. A thicker bottom edge, the polaroid look, or a border on two sides only is a layout job for a design tool. We say so rather than fake it. For an even keyline, a rounded frame or a brand-colour border on a whole set, the dial is enough.
Q:Can I add an outline to a PNG, or a glow effect?
Not around a cut-out. The border follows the image's frame, square-cornered or rounded, not the shape of a transparent subject, and the editor draws no glow around a picture. On a transparent PNG the border runs round the canvas edge and the file stays a PNG. Its one glow is for text: the Neon font on the Objects tab.
Q:Is there a watermark or do I need an account?
No watermark and no account. The border tool is free, with the same daily allowance as every tool on the site, counted beside the tool. Drop a photo, set the border, save and download: nothing is stamped on the picture and nothing asks you to sign in. Files are wiped automatically once they have been processed.
Q:Can I add a border on my phone?
Yes. Open the border tool in Safari or Chrome, tap the drop zone and pick a photo from your library. The editor opens on Regions with the white border in place; the dial drags with a finger, and the swatches sit in the same row. A HEIC photo needs one conversion to JPG first, because the editor does not open HEIC yet.
Q:Do you keep the photo I add a border to?
No. We keep nothing: files are processed and wiped automatically, never archived and never used for anything else. The editor redraws the bordered picture, so the saved copy carries none of the photo's EXIF metadata, GPS location included, and a bordered photo you post carries no record of where it was taken. The Keep EXIF metadata switch cannot bring the camera fields back to an edited copy.