Lower image quality to make a file smaller, or rougher on purpose. The tool arrives with Auto off and Quality at 30: our 9.8 MB camera photo came to 194.8 KB there, and to 80.8 KB at 10. Part of the image compressor.
Output format
– / –
Drop images or browse
JPEG · PNG · WEBP · AVIF · HEIC · up to 50 at once · max 30 MB each
HEIC
PNG
JPEG
AVIF
WEBP
Advanced settings1 on
Smaller30Better
Lower is smaller; higher keeps more detail.
A hard cap for the number your form demands.
KB
A floor for forms that refuse small files.
Max resolution
×
Empty side keeps the ratio. Never enlarges.
Every size target, one guarantee
A page for each number, arriving with the cap already armed. Under it, or a clear error, and never over.
Drop it here: Auto is off and the Quality slider waits at 30, in the panel under the drop zone. Move it lower for a smaller, rougher file, higher for a cleaner one, and the next drop uses the new value. The output is a JPEG, the format where quality means something, at the same width and height: our camera photo stayed 4964 × 2782 at every setting from 95 to 1. Only the detail and the bytes go down.
What does a lower quality photo look like?
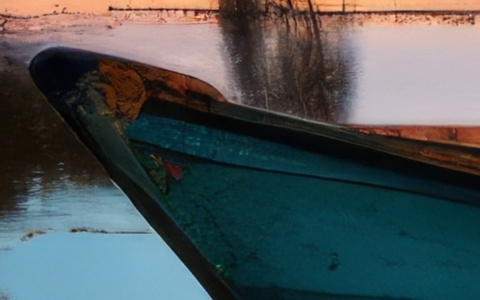
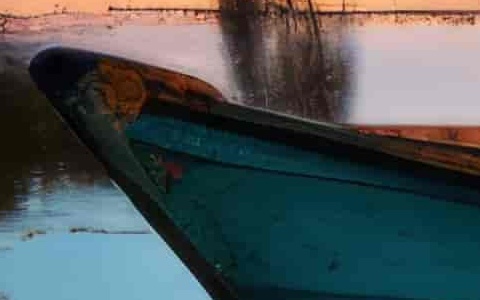
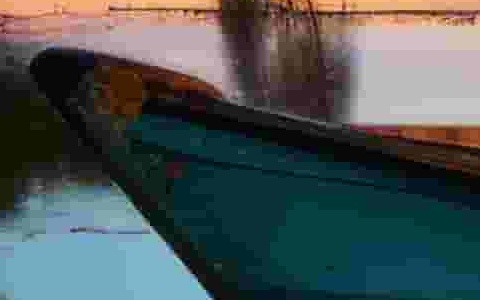
Softer first, then blocky. At quality 30 our camera photo lost the fine cracks in the boat’s paint and kept everything you would describe; at 10 the water broke into squares of colour and the edges went soft. The whole file went from 9.8 MB to 194.8 KB, then to 80.8 KB.
The original9.8 MB
Quality 30194.8 KB
Quality 1080.8 KB
The same 480 × 300 pixels of our 4964 × 2782 camera photo, cut at full size from each whole file the engine saved. Each crop is re-saved at quality 95 for this page; the sizes are the whole files’.
How much smaller does a lower image quality make the file?
The first steps down save the most. Our camera photo fell from 2.6 MB at 95 to 542.3 KB at 75, 21% of it, then kept shrinking more slowly: 194.8 KB at 30 and 49 KB at 1. Below 30 there is little left to save, and the picture pays for every kilobyte.
Quality
Relative to source
Camera photo
Reference photo
95
2.6 MB
576.8 KB
85
807.1 KB
339.6 KB
75
542.3 KB
253.3 KB
65
419.4 KB
203.7 KB
50
307.9 KB
160.4 KB
30
194.8 KB
111 KB
10
80.8 KB
44.8 KB
1
49 KB
14 KB
Sources: source.jpeg, 9.8 MB at 4964 × 2782, and photo.jpg, our reference photo, 576.8 KB at 1920 × 1280, each saved as a JPEG at the quality in its row, Auto off. At 95 the reference photo came back as its original, which the re-encode could not beat.
Every byte count is the size of the actual file our engine produced from the named source, the same bytes you would download, not an estimate. The reference photo is one of our own photographs, an iguana on a branch, and the camera photo is a real one too. Drop your own file into the tool above to rerun any of them. How we measure names the sources and the settings.
Low quality image maker, or a smaller file?
Both, within limits. Most people who lower image quality want a smaller file that still looks right, and 30 to 60 on the slider does that for a photo. A low quality image maker for a joke or a meme wants the damage itself, and 1 to 10 gives the blocky, smeared look in the crops above. What the slider will not add is the rest of a deep-fried picture: the burnt colour and the grain come from an image editor.
Should I lower the resolution of an image instead?
Often, when the picture is shown small. Fewer pixels make a smaller file without the blocks: our 576.8 KB reference photo at half its width and height, 960 × 640, came to 89 KB with the quality on Auto, against 111 KB at quality 30 and full size. For a web page or a thumbnail, lower the resolution in the image resizer and keep the quality up; lower the quality when the pixel size is fixed.
A form states a size in KB or MB
Set Max file size instead: the engine finds the quality that fits, never over.
The picture is a screenshot or a logo
Low JPEG quality smears text and edges. Compress it as a PNG instead.
You want the original back later
Lower the quality of a copy. Detail thrown away does not come back.
Questions, answered
The panel is already open above. One drop settles most of these.
Q:How to make an image lower quality on purpose?
Drop it here and slide Quality down to between 1 and 10 before you download. The tool arrives at 30, which only softens a photo; the bottom of the slider breaks it into blocks. Our 9.8 MB camera photo came to 80.8 KB at 10 and 49 KB at 1, both visibly rough, with the width and height unchanged.
Q:How to make a photo lower quality without ruining it?
Turn Auto back on and let the engine pick a quality for each image: our reference photo came to 273.9 KB there from 576.8 KB. By hand, our camera photo was 807.1 KB at 85, 419.4 KB at 65 and 307.9 KB at 50. Compare the result on your own photo before you settle.
Q:Is this an image low quality converter?
Yes. Drop a JPG, PNG, WebP, AVIF or HEIC and it comes back as a JPEG at the quality the slider shows, 30 when the page opens. The conversion and the lower quality happen in one save. The width and height stay the same; only the detail and the bytes go down.
Q:What does a photo quality decreaser do?
A photo quality decreaser saves your photo again with less detail, so the file gets smaller. The picture turns softer first, then blocky near the bottom of the scale. The width and height stay the same. The Quality slider in Blinkimg is one: 100 keeps the most detail and 1 keeps the least.
Q:What is the lowest quality image setting?
Quality 1, the bottom of the slider. Our camera photo came to 49 KB there, from 9.8 MB, and our reference photo to 14 KB. Below 10 the file still shrinks, from 80.8 KB to 49 KB on the camera photo, but the picture is already in blocks. For a smaller file than that, remove pixels instead.
Q:Can I deep fry pics here, like an image deep fryer?
Only the compression part. A deep-fried picture is heavy JPEG compression plus burnt, oversaturated colour, harsh sharpening and grain, often saved several times over. This tool does the first: slide Quality to between 1 and 10 and download. Add the colour and the grain in an image editor first, then run the result through here last.
Q:Why does my image quality look lower after I upload it?
Because many sites save your upload again at their own settings, and each JPEG save throws away more detail. You cannot switch their encoder off, but you can give it less to do: upload a file already at the size and pixel dimensions the site shows, so its own save changes as little as possible.
Q:Does lower picture quality reduce the resolution?
No. Quality and resolution are separate settings. The Quality slider only changes how much detail the JPEG keeps; our camera photo stayed 4964 × 2782 at every setting from 95 to 1. To reduce the resolution, set Max resolution in the same panel or use the image resizer, which changes the pixels and leaves quality on Auto.
Q:Can I lower the quality of several images at once?
Yes, up to 50 in one drop, all at the quality the slider shows when you drop them. Each comes back as its own JPEG, or all of them in one zip file, with its new size printed beside it. Change the slider between drops to try another setting on the same files.
Q:Can I undo a lower quality?
Not in the new file: the detail it threw away is gone, and saving it again at a higher quality only makes it bigger. Your original is untouched, since the tool works on a copy and hands back a new file. Keep the original and lower the quality of a copy.
Q:Is it safe to lower the quality of my photos here?
We keep nothing. Files are processed and wiped automatically, deleted within 24 hours of upload at the latest, and never used for anything else. EXIF metadata, which on a phone photo includes the GPS position, is stripped from every output by default. No account is needed.