How to resize an image without losing quality
Shrink with a smooth kernel, save once, and keep the original. Enlarging adds pixels but no detail, unless the image is a vector. Part of the image resizer.
By Sahadat Husain14 min readGuides

You resize an image without losing quality by shrinking it with a good kernel and saving it once. We measured where the quality goes on our 9.8 MB camera photo. The photo went from 4964 × 2782 pixels to 1920 × 1076.
On this photo, the resize itself cost little. Blinkimg’s engine scored 49.7 dB against an exact average of the source pixels. The save cost more: its JPG at Auto scored 38.5 dB in 140.3 KB. Enlarging is the hard case, because a photo gains pixels but no detail.
Resize to 1920 × 1076
sharp’s Lanczos 3: 49.7 dB
sharp’s nearest neighbour: 42.2 dB
Save once
Blinkimg’s engine, JPG at Auto: 38.5 dB
140.3 KB at 1920 × 1076
Save again
The engine, 10 saves at 85: 37.9 dB
sharp’s PNG, 10 saves: no change
Enlarge
A 400 × 250 PNG, 4 times by sharp: 32.3 dB
The SVG, drawn by sharp at 1600 × 1000: crisp
Does resizing an image reduce quality?
Resizing an image smaller always throws pixels away, but a good kernel keeps what you can see. The camera photo went from 13.8 million pixels to 2.1 million. That is 85% fewer pixels.
Apple’s Preview User Guide names the one route that keeps every pixel. “Make the image’s dimensions smaller without losing any detail: Deselect ‘Resample image’ before changing the width or height.”
Without resampling, the pixel count stays and only the print size changes. How to change the DPI of an image covers that case. A smaller file for a screen needs real resampling, and then the kernel decides what stays.
How to downsize images without losing quality
You downsize an image well with any smooth kernel, such as bilinear, Mitchell or Lanczos 3, never nearest neighbour. A kernel is the rule that blends source pixels into each new pixel.
We resized the photo to 1920 × 1076 with each kernel in sharp 0.35.4. Blinkimg’s engine is built on sharp. Every result stayed lossless, so no encoder touched the score. The referee is an exact area average: each new pixel is the mean of the source pixels it covers.
| Kernel | Made by | PSNR | SSIM | Edge detail |
|---|---|---|---|---|
| Area average | the referee | (the reference) | 1.0000 | 3.83 |
| Nearest neighbour | sharp 0.35.4 | 42.2 dB | 0.9875 | 4.97 |
| Bilinear | sharp 0.35.4 | 50.8 dB | 0.9979 | 3.47 |
| Mitchell | sharp 0.35.4 | 51.4 dB | 0.9981 | 3.55 |
| Lanczos 3 | sharp 0.35.4 | 49.7 dB | 0.9975 | 4.18 |
| Lanczos 3 in 9 steps | sharp 0.35.4 | 45.8 dB | 0.9937 | 4.43 |
| Its default (Lanczos 3) | Blinkimg’s engine | 49.7 dB | 0.9975 | 4.18 |
| Its own, unnamed | macOS sips, saved as PNG | 43.3 dB | 0.9917 | 3.56 |
PSNR and SSIM measure closeness to the referee; higher is closer. Edge detail is the mean jump between neighbouring pixels. It cannot tell real edges from aliasing or ringing, so the crops below are the evidence.
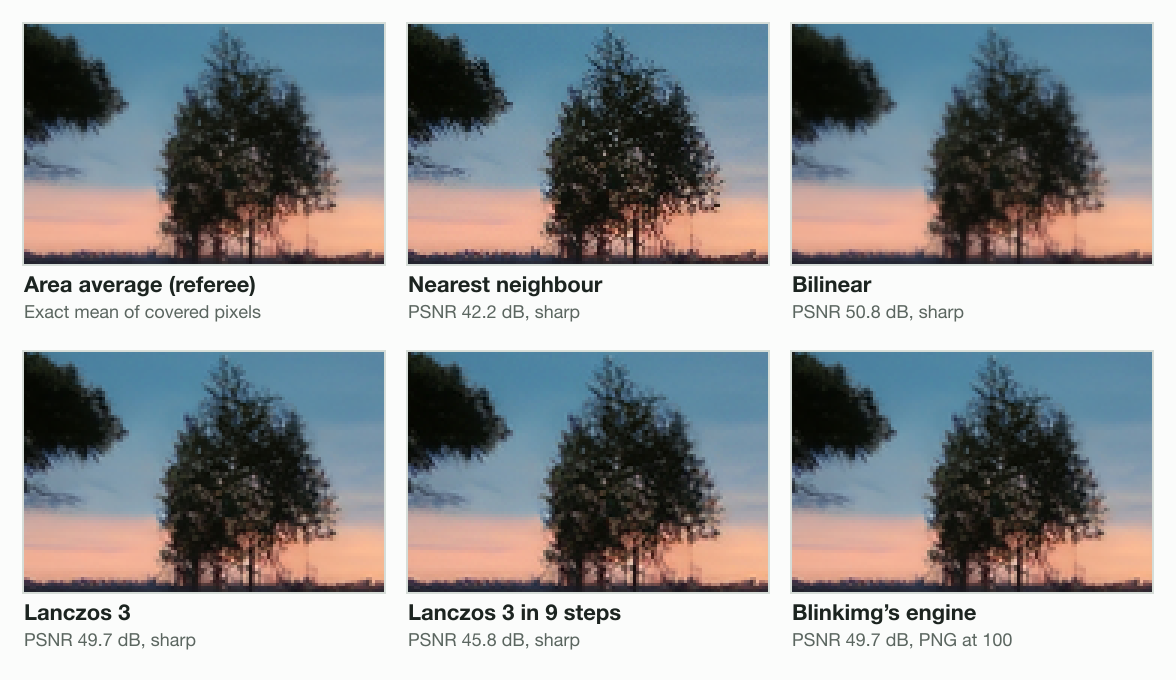
Nearest neighbour scored lowest, 42.2 dB. Nearest neighbour copies one source pixel and skips the rest. In the crop, thin branches break into dots. Its edge detail, 4.97, sits above the referee’s 3.83, and the crop shows that excess is aliasing.
An area-average referee rewards smooth kernels, so Mitchell and bilinear scored closest to it: 51.4 dB and 50.8 dB. The three smooth kernels landed within 1.7 dB of each other. In the crop, Lanczos 3 looks a little crisper, with no visible ringing. That is a preference by eye, not a measured win.
sharp’s resize docs list Lanczos 3 as the default kernel. Blinkimg’s engine keeps that crisper default. Its file matched sharp’s Lanczos 3 to 62.2 dB, which is near identical.
Small steps did not help here
ON1’s resizing guide advises “Downsizing by 10-20% at a time, while applying subtle sharpening between steps”. We ran the steps without the sharpening, so our test checks the increments alone. sharp’s Lanczos 3 took the photo from 4964 to 1920 wide in 9 equal steps of about 10 percent. The result scored 45.8 dB, 3.9 dB below a single step.
Each step resampled pixels that the step before had already resampled. On this photo, one resize straight to the final size scored higher.
On this Mac, sips on macOS 26.5.1 scored 43.3 dB. sips is the image command built into macOS, and Apple does not name its kernel. How to resize an image on Mac walks through Preview and sips.
Which format keeps the most quality at 1920 wide?
On this photo, AVIF kept the most quality per byte at 1920 wide. Blinkimg’s engine made a 69.8 KB AVIF at Auto that scored 39.1 dB. Each file is scored against the engine’s lossless PNG of the same resize. The score is the encoder’s alone.
One photo at 1920 × 1076, seven files (KB)
- PNG, lossless2,463.2 KB
- PNG at Auto606.7 KB
- JPG at Auto140.3 KB
- WebP at quality 80106.9 KB
- WebP at Auto85.5 KB
- AVIF at Auto69.8 KB
- AVIF at quality 4761.1 KB
| File | Size | PSNR | SSIM |
|---|---|---|---|
| PNG, lossless (the control) | 2,463.2 KB | identical | 1.0000 |
| JPG at Auto | 140.3 KB | 38.5 dB | 0.9720 |
| WebP at Auto | 85.5 KB | 37.7 dB | 0.9661 |
| AVIF at Auto | 69.8 KB | 39.1 dB | 0.9698 |
| PNG at Auto, 256 colours | 606.7 KB | 36.5 dB | 0.9402 |
| WebP at quality 80 | 106.9 KB | 38.7 dB | 0.9720 |
| AVIF at quality 47 | 61.1 KB | 38.6 dB | 0.9665 |
Matched for quality, the order holds. At the JPG’s 38.5 dB, AVIF needed 61.1 KB and WebP 106.9 KB, against the JPG’s 140.3 KB. The resize did its own share too. The engine’s JPG at Auto of the full 4964 × 2782 photo was 605.5 KB.
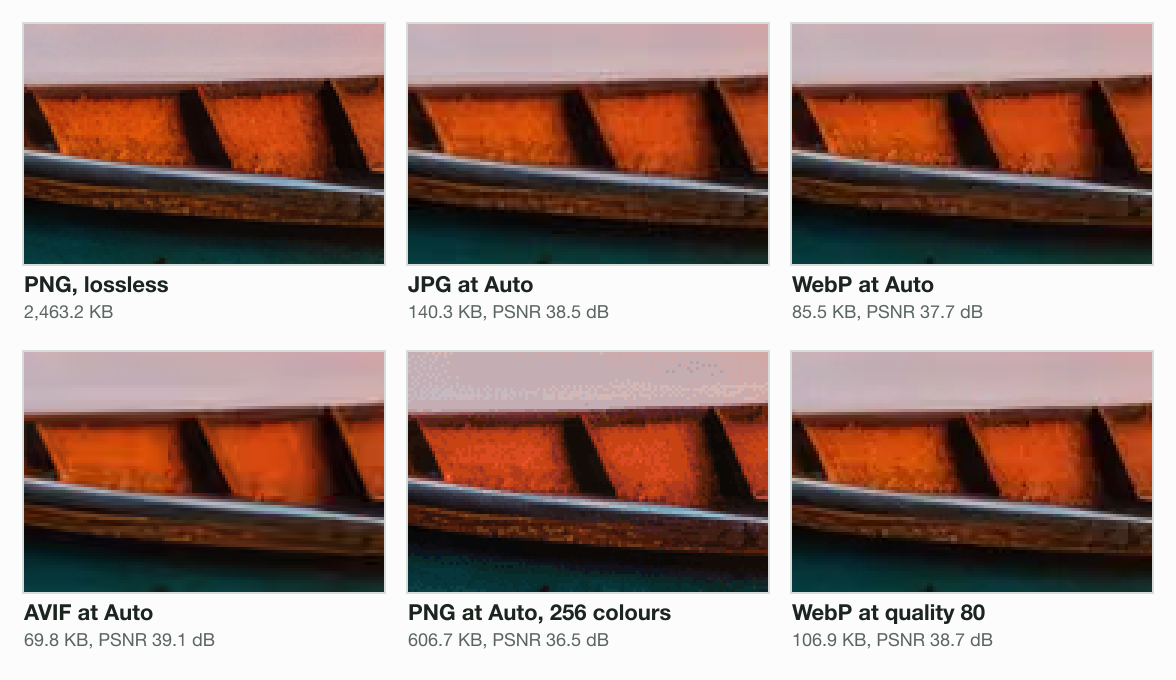
A lossless PNG keeps every resized pixel, at 2,463.2 KB. PNG at Auto cuts that to 606.7 KB with a 256-colour palette, and scored lowest, 36.5 dB. The PNG compressor explains that trade. AVIF vs WebP vs JPEG compares the three lossy formats on more files.
Saving a JPG again lost a little more each time in our test
In our test, the JPG lost a little quality each time it was decoded and saved again. We saved the lossless 1920 × 1076 PNG as a JPG at quality 85. Then we decoded and saved that JPG 9 more times.
dB lost since the first save
- Save 20.47 dB
- Save 30.76 dB
- Save 40.97 dB
- Save 51.14 dB
- Save 61.29 dB
- Save 71.41 dB
- Save 81.50 dB
- Save 91.59 dB
- Save 101.65 dB
| Saves | Blinkimg’s engine | sharp, default settings |
|---|---|---|
| 1 | 183.7 KB, 39.6 dB | 225.0 KB, 39.5 dB |
| 2 | 182.1 KB, 39.1 dB | 225.0 KB, 39.3 dB |
| 3 | 181.5 KB, 38.8 dB | 225.0 KB, 39.2 dB |
| 5 | 181.1 KB, 38.5 dB | 225.0 KB, 39.0 dB |
| 10 | 180.7 KB, 37.9 dB | 224.9 KB, 38.8 dB |
| PNG, 10 saves | (not run) | 4,177.9 KB, identical |
The first save scored 39.6 dB with the engine, the largest drop. The 9 saves after it took 1.7 dB more with the engine and 0.7 dB with sharp. Every save moved the pixels again, and none moved them back.
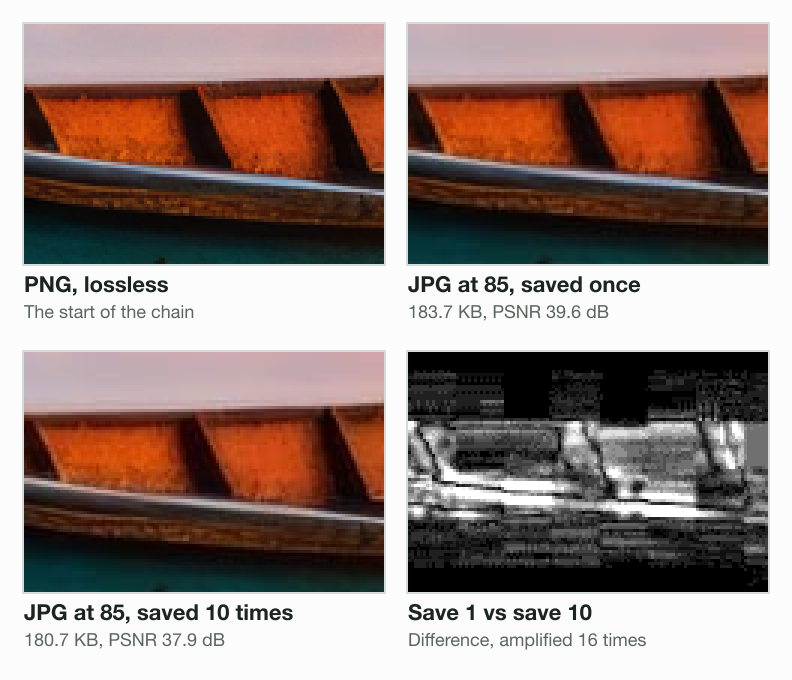
The PNG chain is the control. Saved 10 times by sharp, the PNG kept every pixel of the start.
How to make an image larger without losing quality
You make an image larger without losing quality only when it is a vector, such as an SVG. Every other image gets softer as it grows.
A photo is a raster, a fixed grid of pixels. Enlarging one invents the new pixels from their neighbours. How to resize an image in Paint measured three kernels enlarging a photo. None brought back the original pixels.
The W3C’s SVG 2 specification defines SVG as “a language for describing two-dimensional graphics”. An SVG stores shapes, not pixels, so a renderer draws it fresh at each size.
We tested a 2.1 KB SVG drawing from this site’s code: a photo frame, an arrow and a check. sharp drew it at 400 × 250, 18.5 KB as a PNG. It drew the SVG again at 1600 × 1000, 88.5 KB. Then sharp enlarged the small PNG 4 times with Lanczos 3.
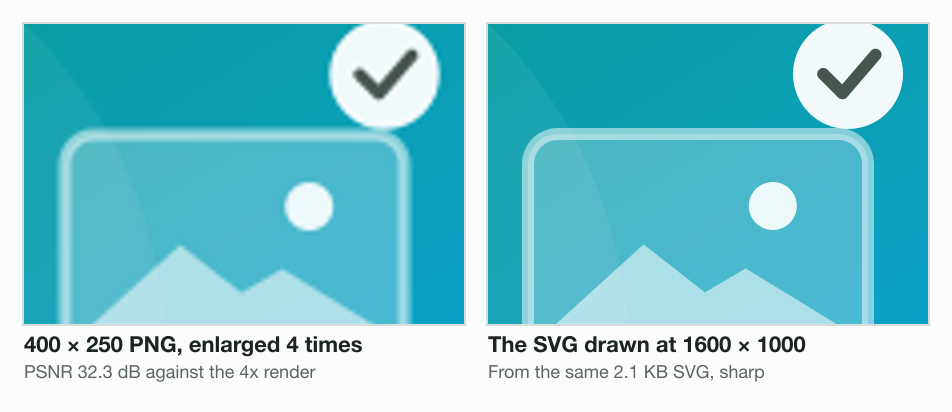
Against the 1600 × 1000 drawing, the enlarged PNG scored 32.3 dB, and every edge went soft. The vector cost nothing to enlarge: one 2.1 KB file serves both sizes.
For a photo, the best enlargement starts from a bigger original. Adobe’s resampling page lists Preserve Details 2.0 for enlarging. Adobe says it “maintains sharp edges and fine detail with reduced artifacts”.
How to resize image without pixelation
Pixelation comes from nearest neighbour resampling, or from showing a small image too large. Pick a smooth kernel and start with enough pixels.
Adobe describes Nearest Neighbor as producing “a crisp, blocky look that preserves hard edges”. That is the dotted tree in our kernel picture. Adobe adds that it is “ideal when you want a classic pixelated style without blurring”.
So pixel art is the exception. Enlarge it by whole numbers with nearest neighbour, and each pixel becomes a clean square. Our zoomed crops use that rule.
How to change image size without losing quality, step by step
Every route below shrinks with a smooth kernel and lets you pick the format. Start from the original file, not an earlier export.
In a browser, with Blinkimg’s image resizer
Open the image resizer and drop your photo
The image resizer takes JPG, PNG, WebP, AVIF and HEIC.
Set Max resolution in Advanced settings
Type 1920 for the width and leave the height empty. The page says it “Never enlarges.”
Pick the output format, then download
AVIF made the smallest file in our test. The engine resizes with Lanczos 3, then encodes once.
On a Mac, with Preview or sips
Open the image in Preview
Choose Tools > Adjust Size.
Keep Scale proportionally and Resample image selected
Enter the new width. Apple’s guide says the other value changes to keep the proportions.
Click OK, then File > Export
Pick the format there, so the original stays as it was.
sips -s format png --resampleWidth 1920 photo.jpg --out photo-1920.pngIn Photoshop
Choose Image > Image Size
These steps come from Adobe’s Resize images page.
Lock the aspect ratio and type the new width
Select the Constrain aspect ratio icon, so the height follows.
Select Resample and pick Bicubic Sharper (reduction)
Adobe says it “helps maintain sharpness when reducing size.” Click OK.
On a phone, How to resize an image on iPhone covers Preview on iOS and a one-tap shortcut. To change the shape instead, the aspect ratio changer crops; it never stretches.
Which resize keeps your image’s quality?
The right resize depends on the image type and the direction. A vector scales freely; a photo shrinks well and enlarges badly.
Is the image a vector, such as an SVG?
- Yes
Scale it to any size
sharp drew our 2.1 KB SVG crisp at 1600 × 1000.
- No
Do you need it larger than it is?
- Yes
Find a bigger original
A 400 × 250 PNG enlarged 4 times by sharp scored 32.3 dB.
- No
Shrink once with a smooth kernel, save once
Blinkimg’s engine at 1920 × 1076: a 69.8 KB AVIF, 39.1 dB.
- Yes
For a full-HD screen, the 1920 × 1080 image resizer sets that size for you. To cut more bytes after the resize, How to reduce image file size covers the settings. Image formats explained helps you pick the format.
Read the full guide: How to reduce image file size on any device.
Questions
- Can I enlarge an image without losing quality?
- Only a vector image, such as an SVG, enlarges without loss, because it is redrawn at each size. A photo gains pixels but no detail. sharp enlarged a 400 × 250 PNG of a drawing 4 times with Lanczos 3. Against the same drawing rendered at that size by sharp, it scored 32.3 dB.
- What is the best way to reduce image size without losing quality?
- Shrink the pixels with a smooth kernel, then save once in an efficient format. Blinkimg's engine took our 9.8 MB camera photo to 1920 × 1076. As an AVIF at Auto it was 69.8 KB and scored 39.1 dB against a lossless copy.
- Does resizing an image reduce quality?
- Shrinking removes pixels, but a good kernel keeps what you can see. Our photo went to 1920 × 1076 at 49.7 dB with sharp's Lanczos 3 against an exact area average. Apple's Preview guide notes that deselecting Resample image keeps every pixel, changing only the print size.
- What causes image quality loss when resizing?
- Resizing loses quality in three places: the kernel, the encoder and repeated saves. On our photo at 1920 × 1076, sharp's nearest neighbour scored 42.2 dB against its Lanczos 3's 49.7 dB. Blinkimg's engine scored 38.5 dB for one JPG save at Auto. Ten saves at quality 85 by the engine fell to 37.9 dB.
- How to resize an image but keep quality?
- Start from the original file and shrink it in one step. Use a smooth kernel such as Lanczos 3 or Bicubic Sharper. Save once, in AVIF, WebP or a high-quality JPG. Keep the original or a PNG master, and make every later export from it, not from an earlier JPG.
- How to shrink an image without it getting blurry?
- Resize once with a smooth kernel such as Lanczos 3, or Bicubic Sharper in Photoshop. Adobe says Bicubic Sharper helps maintain sharpness when reducing size. On our photo at 1920 × 1076, sharp's Lanczos 3 scored 49.7 dB in one step. Nine equal steps without sharpening scored 45.8 dB.
- Which type of image can be resized without losing quality?
- A vector image, such as an SVG, resizes without loss in both directions. The W3C's SVG 2 specification calls SVG a language for describing two-dimensional graphics. Our 2.1 KB SVG drew sharp at 400 × 250 and at 1600 × 1000.
- How to enlarge a small photo without pixelation?
- Use a smooth kernel, never nearest neighbour, and enlarge as little as you can. Adobe lists Preserve Details 2.0 and Bicubic Smoother for enlarging in Photoshop. Pixelation is the blocky look nearest neighbour makes. A smooth kernel trades it for softness, since no kernel can add detail the photo never had.
- How to make pixel art not blurry when resizing?
- Resize pixel art with nearest neighbour, by whole numbers such as 2, 3 or 4 times. Each pixel then becomes a clean square. Adobe's Photoshop help calls Nearest Neighbor ideal for a classic pixelated style without blurring. Smooth kernels such as bilinear blend the colours, which blurs the hard edges.
- How to scale an image without losing quality?
- Scale down in one step with a smooth kernel, and scale up only a vector. On our 9.8 MB camera photo, sharp's Lanczos 3 scored 49.7 dB in one step to 1920 × 1076. Shrinking in 9 steps of about 10 percent, without sharpening, scored 45.8 dB. Both scores are against an exact area average.
- How can I resize an image without losing quality?
- On a Mac, use Preview's Tools > Adjust Size with Resample image selected, then export. In Photoshop, use Image Size with Bicubic Sharper. In a browser, an image resizer with a Max resolution field works. Blinkimg's engine resizes with Lanczos 3, which scored 49.7 dB on our photo at 1920 × 1076.
- Does saving a JPG again reduce quality?
- A JPG loses a little quality each time it is saved again. Blinkimg's engine saved our 1920 × 1076 photo as a JPG at quality 85. The JPG scored 39.6 dB after one save and 37.9 dB after 10. The same photo saved 10 times as a PNG stayed identical. Keep a lossless master and export from it.